The Airfig Interface
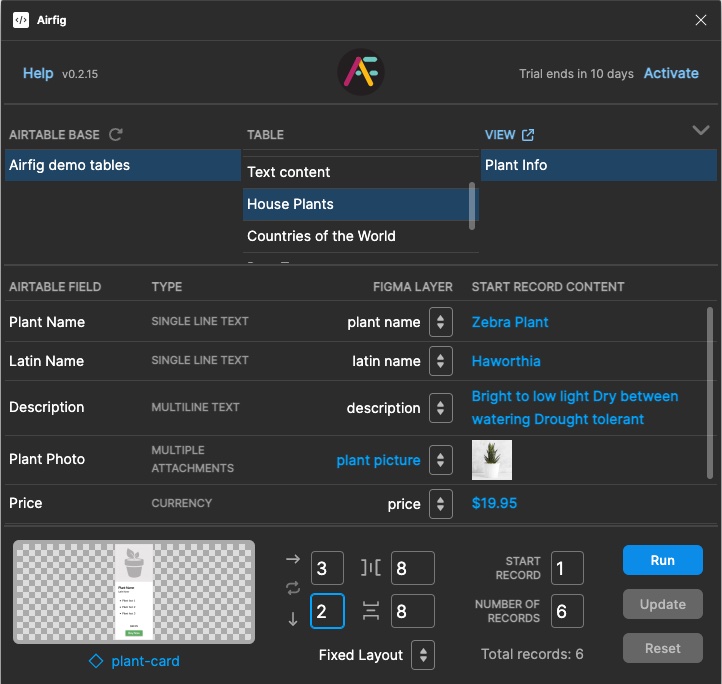
The Airfig Interface is divided into four areas:
Header Area

- The Help link opens the Airfig Help page on the redbar.io website
- The version number displays — this is always the current version, as Airfig always loads the latest version from the Figma site when you open it.
- The Airfig logo displays a spinner when Airfig is loading, connecting to Airtable, or updating data from Airtable (see 5 and 8 below for Update Data details)
- The Free Trial Info Area displays the Days Left on your free trial and the Activate button, which links to the page where you can buy your Airfig subscription. If this area is blank, your subscription is active.
Airtable View Selection Area
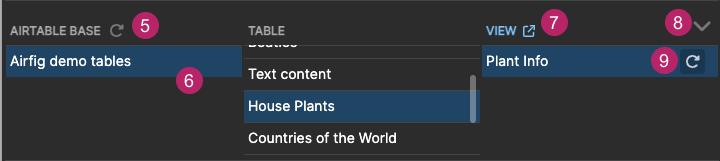
- The Update Base Data icon will update Airtable the list of tables of the selected base. You normally only need to use this control if you have added or removed tables or views in your currently selected base. Note you will lose the current table selection when you do this — in most cases, you will want to use the Update View control to ensure you are using the latest Airtable data (see 9 below).
- All authorized Airtable bases display here. Select a Base to list its Tables, and select a Table to list its Views. Airtable requires a View to be selected before it will Run. See the FAQs to learn how to Authorize Airtable Bases.
- The Airtable View button opens the currently selected View in Airtable in a new browser tab.
- The Minimize Airtable control reduce the vertical height of Airfig while still displaying key info such as the selected Base, Table and View and the number of currently mapped Airtable fields
- The Refresh View Data control updates Airfig with the current data of the selected Airtable View. Unlike the Update Base Data control, you will not lose your current View selection when you run an Update View. It’s good practice to run a Refresh View Data before doing an Update (see 20 below).
Mapping Area
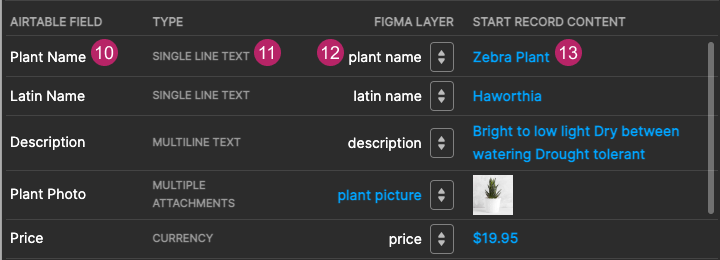
- The Airtable Field column displays the fields of the currently selected Airtable View.
- The Airtable Field Type displays the type of each displayed Airtable field. The following Airtable Field Types are compatible with Airfig:
- Text
- Attachment (Video, Images)
More to add –
Other Airfig-compatible Airtable field types will be added future Airfig releases.
- The Figma Layer column displays the names of the Figma layer to which the corresponding Airtable field is mapped. Mapping associates an Airtable field with a Figma layer—when Airfig runs, each mapped layer will be populated with the corresponding Airtable field data.
Only Airtable fields with Airfig-compatible field types types can be mapped (see 11 above) A frame containing content layers (text, images, etc.) must be selected in Figma before layers can be mapped to fields.
If an Airtable field and the layers of the selected Figma frame are the same, Airfig will automatically map these fields. If you wish to map fields and layers with different names, you can do this with the Mapping Menus in the Figma Layer column, which display all of the currently selectable layers that have not been auto selected. Manually selected Figma Layer names display in blue.
You don’t have to map all the available Figma layers to the displayed Airtable fields. Select None in the appropriate Figma Layer menu, and the corresponding Airtable field will not be mapped. - The Start Record Content displays the content of each mapped field of the first record in the series of Airtable records (rows) that Airfig will use, so you can confirm you have made the right mappings. The first record is set by the Start Record setting (see 18 below).
Define Layout Area
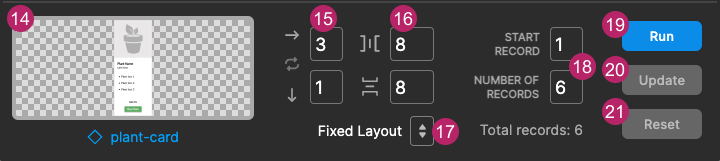
Define Layout Area
- The Selected Template Display shows the selected frame that Airfig will use as a template for each Airtable record. When this template selection is made, Airfig will attempt to match the names of its child content layers (text, images, etc.) with the names of selected Airtable View’s fields. Matches are auto-mapped, as described in 12 above. Note that the checkerboard background will show through any transparent areas of the selected frame.
- The Columns and Rows controls allow you to specify a number of rows and columns. When Airtable runs, the selected template will be “tiled” to create the specified layout. The content layers of each duplicate will be populated with data from sequential records in the selected Airtable view. (The Airtable records that Airfig uses is determined by the Record Selection controls (18) described below.). You can increment and decrement the Layout controls values by 1 using the Up and Down arrow keys.
- The Spacing controls determine the space between the tiles specified in The Layout Tiling controls. You can increment and decrement the Layout controls values by 1 using the Up and Down arrow keys. You can increment and decrement the values by 8 with Shift & Up and Down arrow keys.
- The Layout Type control lets you specify whether the Airfig layout is fixed or fluid.
A Fixed Layout is a defined width and height, based on the number of tiles in the layout (see 15) and the defined spacing between them (see 16).
A Fluid Layout fills the parent frame in which it is created, and the vertical and horizontal spacing is whatever is required to spread the tiles across the available space in the parent container.
See How Airfig Creates Layouts for important additional details on how Airfig builds tiled layouts.
- There are two Airtable Record Selection controls.
The Start Record control lets you define the Airtable record that will be used for the first tile in the layout. The Start Record Content display (see 13) updates as you change the Start Record setting.
The Number of Records setting defines how many records will be used to populate the cards. Typically, you can leave this control set to the default, which is the total number of records in the view. Airfig will then use as many records as it needs to populate the tiles with data.
However, you can choose a number of records that is lower than the number of tiles you are generating, and Airtable will simply cycle through the number of records you define as many times as needed to populate the tiles. This is useful if you only have a limited number of records available while you are creating your layout. Later, as more data becomes available, you can update the layout with more records using the Update control (see 20 below).
- The Run button generates the layout you have defined, using the selected Airtable view (see 6 above), the mapping of the view’s fields to the selected template (see 12 above), and the layout settings (see 14 thru 18 above).
If the layout is not the result you expect, do not deselect the newly-generated layout — just press the Reset button (see 21 below).
- The Update button will Update the content in a layout that was created in Airfig by pressing Run. Be sure to select the af-layout frame layer that Airfig wraps around the layouts that it creates before pressing Update.
- The Reset button “tears down” an Airfig generated layout, reverting it back to the template card, so you can make changes to the template or your Airfig settings, and Run again. You must select the af-layout layer of an Airfig for the Reset button to become active.