Create Figma Tables Faster with Airfig and Airtable
Airfig is Figma plugin that can generate multiple copies of a card or table row, populating each one with an Airtable record. If you’re data is in Excel or .csv, it’s easy to first bring it into Airtable.
In this tutorial, we will go through the steps to create a robust table row, and then use Airfig to instantly generate a table with ten rows, each with unique data.
I go over the steps in some detail here, but if you follow along and understand the concepts described, you will not only make tables faster, but also have a deeper understanding of some key Figma concepts, such as frames, auto layout, components and instances.
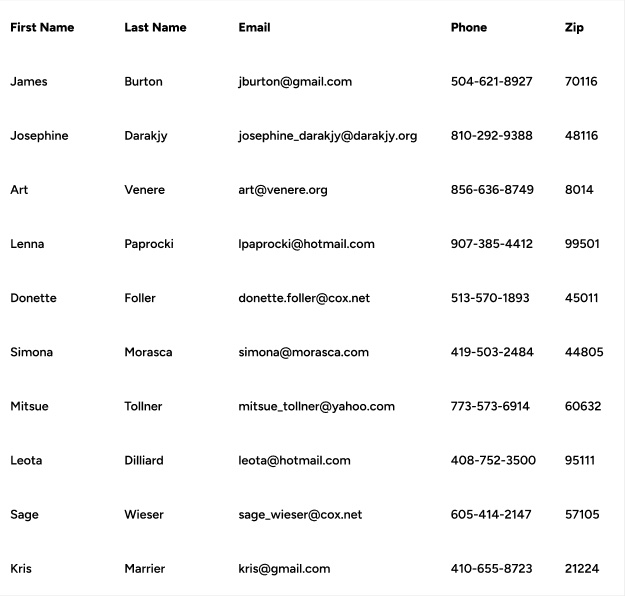
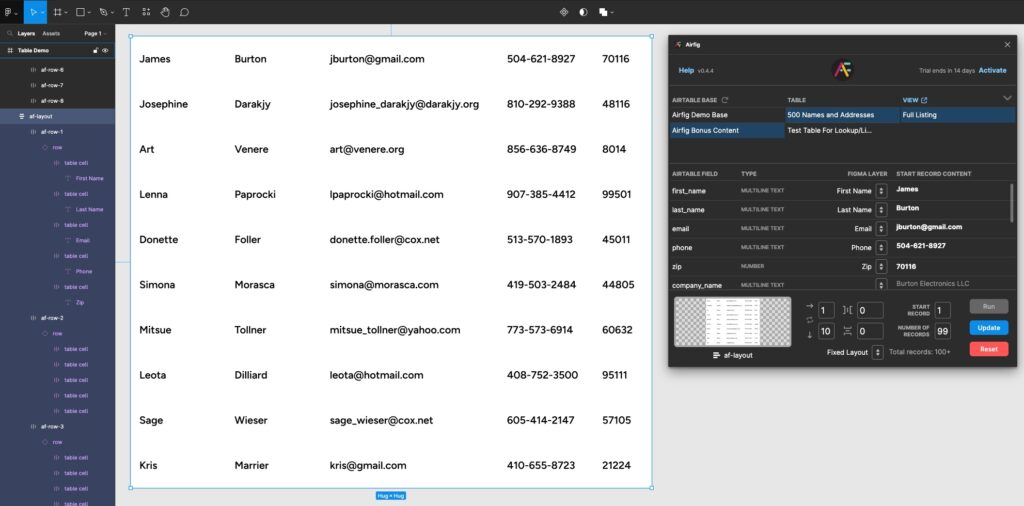 A Figma table layout generated by Airfig
If you are a UI designer, you probably know that creating tables in Figma can be a complex and time consuming task. Let’s say you have to layout a table with 10 records (rows) and each record has 5 fields (columns) of data. That’s 50 data points you have to either invent and enter manually, or copy and paste from a spreadsheet. The work of designing the table itself (your actual job) can seem trivial in comparison.
Managing data in tables can be made a lot easier using the Airfig Figma plugin. Airfig can pull data from Airtable and automatically lay out a table for you. Let’s look at how this works.
Create or import your data into Airtable
The first step is to get your data into Airtable.
Obviously, you can enter that data manually — you can start with as little as a single row of data in your table because Airfig will cycle through Airtable records if there aren’t enough for the number of rows you want in your Figma table.
If you have been supplied a data set in Excel or as a .csv, it’s easy to import Excel data into Airtable. The same steps apply for importing .csv files. (Need some sample data? I am using this 500 record address set for this demo – it took just a few minutes to download and import into Airtable).
Whatever way you get your data into Airtable, just make sure each field (column) has a unique and descriptive name.
Next, follow the Airfig Setup steps to install the Airfig plugin in Figma and use the Connect to Airtable button to connect Airfig to your Airtable.
Now that you have some data in Airtable, it’s time to move to Figma and design a single “template” row for your table in Figma. Airfig will use this template row to generate however many rows of Airtable records that you want in your table.
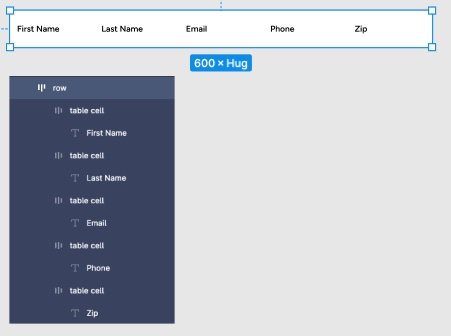
Our Figma table is going to use the following fields from the names and address table : First Name, Last Name, Phone, Email and Zip code, and each table row will display these five fields from a different Airtable record.
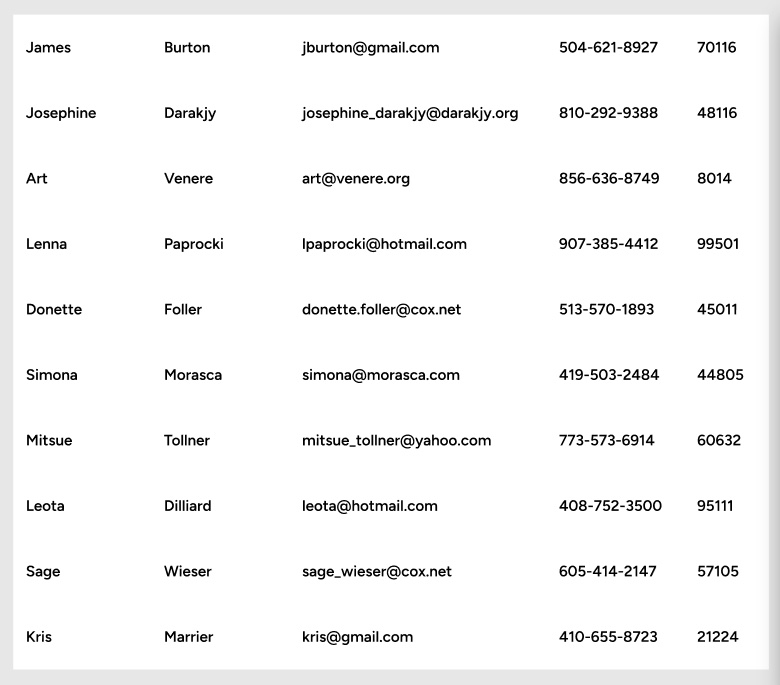
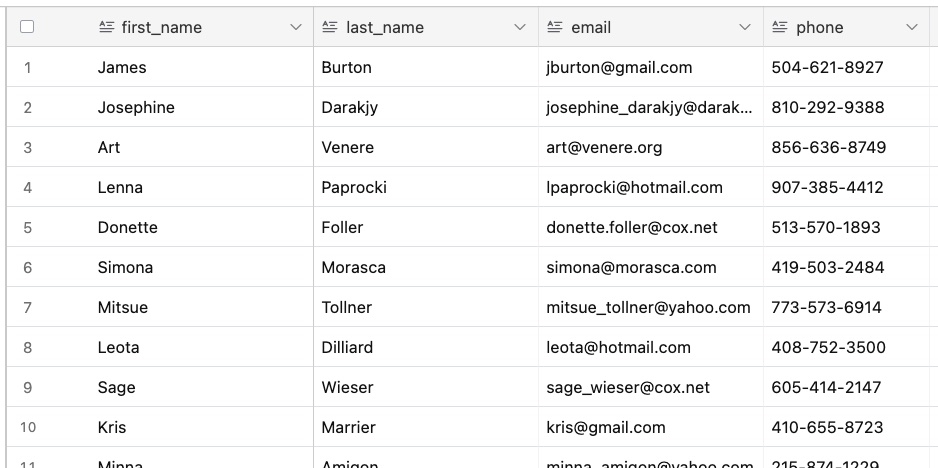 The Airtable data that Airfig will import into your Figma table
Overview of the steps to create the table
You only need to create one row of your table, and Airfig will use that row as a template to generate as many additional rows as you want, so most of this article focuses on how build that “template” table row.
We’ll first build a single table cell, then build a table row of five of these cells. Next, we’ll make a component of the row, and use an instance of the component to instantly (with Airfig’s help) create as many table rows as we need, each populated with a record from our Airtable .
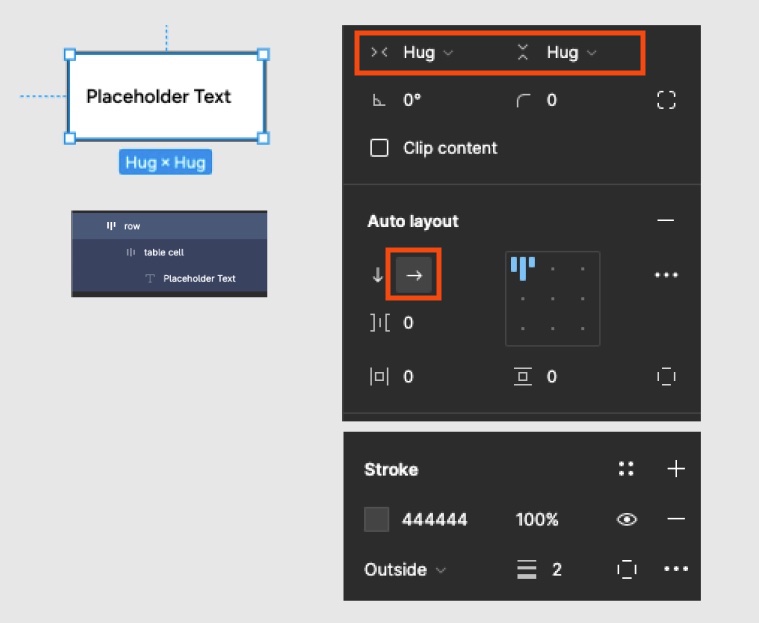
Create a Data Cell
We’ll start with a table cell, the smallest visual unit of our table, which will contain a single data point—there will be five of these in each row of the table.
Let’s start by making each cell 120 pixels wide and 52 pixels high—we will adjust this as needed later once we have the real content in place. Draw a frame (not a rectangle!) 120 pixels wide and 52 pixels high.
Tip: Draw the frame roughly that size and then set it exactly with the numerical Frame Settings.
Name that layer table cell. Fill its background white.
With the frame selected, press Shift-A to add auto layout, and change the Resize Settings from Hug / Hug to Fixed / Fixed. Click the Left-Middle dot on the nine-dot Alignment control. Note Figma automatically adds 10 pixels of padding left/right and top/bottom, which stops any content from touching the edges of the frame. Here’s how all that looks:
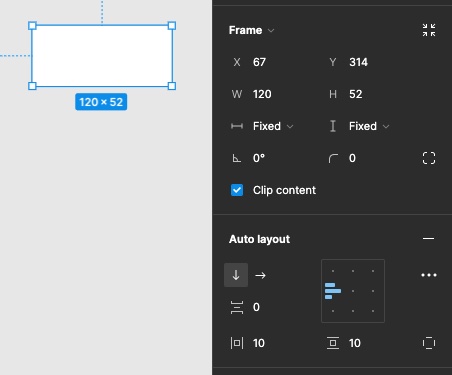
The table cell background – note the Auto layout left-middle positioning for the type layer – added in next step.
Press T to select the text tool. and click inside the frame. You may need to type to see the cursor. No matter where you click in the frame, auto layout will position the text cursor in to the left and middle of the frame. Type a placeholder such as Placeholder Text. We will change that later.
Set the text Resizing to Fill /Fill. Set the Test specs—here I used the Google font Figtree, set to 12 point semibold. Set the text Alignment to middle. Finally, select the Type settings button (three vertical dots) and in the Type Settings popup, set the Resizing to Truncate (see screenshot)
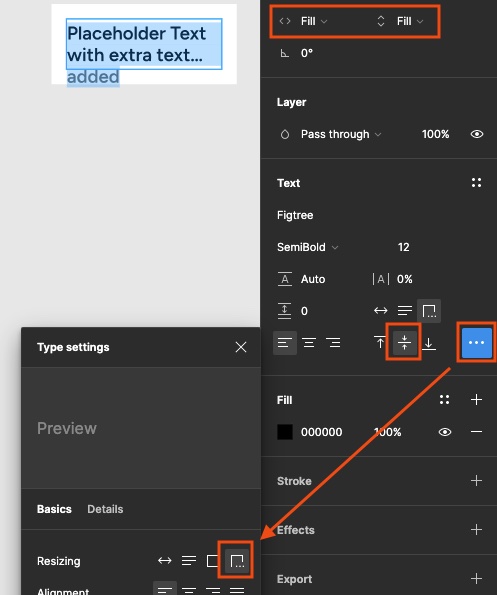
The text is vertically centered and will be truncated with an ellipsis if it is longer than two lines.
These settings give you what I call “bulletproof” text, meaning you text will not resize the cell or break out of it, no matter how long it is. With these settings, if the text is long. it will wrap to a second line, and if it’s longer than that (which is more than the cell in this example can accommodate), Figma will then automatically truncate that second line with an ellipsis, as shown in the screenshot above—the word “added” in the example will be hidden when the text field is deselected.
Now we have a robust table cell, let’s use five of these cells to build the table row.
Create table row
With the table cell frame selected, press option-command-G to wrap it in another frame. Name this new frame layer row container, as it will be the container for the entire row of cells. Put a contrasting stroke on it for now so you can see it and differentiate it from the cell frame. Check that row container’s Resizing is set to Hug / Hug, and set the Auto layout direction to horizontal. Temporarily, we’ll set its stroke (border) to something contrasting like a thick black line so you can check this next step. You should now have this:
The “row” frame is added around a single table cell frame
Select the table cell, that is now inside the new row frame. Press command-D to duplicate the cell. Auto layout will position the duplicate to the right of the original and the row container will expand to accommodate it. Now your layout should look like this.

The duplicated cell positions itself to the right of the original in the auto layout row frame.
You can now duplicate the table cell layer three more times, and will then have a row with five table cells. (If you can see that the row container is still enclosing the cells, you can remove the stroke.)
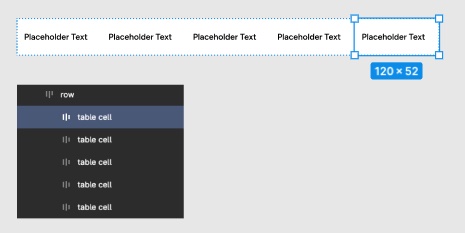
Next, change the text on each cell to the name of the corresponding name of the Airtable field (e.g. Last Name). This will also name the corresponding layer in the left sidebar. Matching the text layer names to the names of the Airtable fields will allow Airfig to map them automatically when it’s time to generate the table rows.
Create a component instance as a template for Airfig
You get full advantage of Airfig’s features if you use a component instance as a template when generating the table, as you will see later.
To convert the frame to a component, select the row container layer and press Option-Command-K. To create an instance from the component, simply option-drag a copy. This instance will be the template that Airfig will use to generate the table.
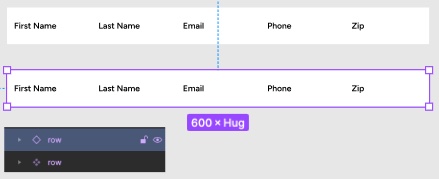
Position the instance so that there is room for the generated table rows to appear below it, select it, and open Airfig.
As shown in the screenshot below, set up Airfig as follows:
In Airfig’s upper panel, select the Airtable base, table and view you want to use.
In Airfig’s center panel, check that the Airtable fields are auto-mapping to the correct Figma layers. You can manually map any field that didn’t auto-map using the dropdown menus in the Figma Layer column.
Next, in Airfig’s lower panel, set the Layout Controls to 1 across by 10 down. Set the spacing control to 0 and 0. This will ensure the generated rows touch.
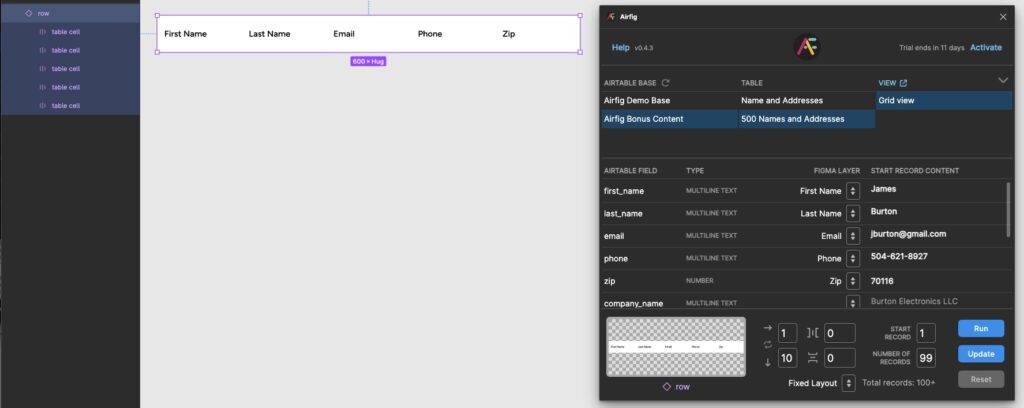
Press Run.
Airfig will instantly generate the table.
Some things to note. Airfig wraps each row in a frame called af-row and wraps the entire layout in a frame called af-layout, which, as shown above will be selected after Airfig runs.
With af-layout selected, pressing the Update button will update the layout with the current Airtable data, so that’s the “one-click” way to update the layout when the Airtable data changes.
With af-layout selected, pressing the Reset button reverts the layout back to the instance card, which allows you to make changes to the layout settings in Airfig, such as altering the spacing, and then press Run again to recreate the layout with the new settings applied.
Final layout adjustments
As you can see in the screenshot above, the table cells are all the same size, which is clearly problematic now that the data is in place. The email field is too small for the longer email address, which are are being truncated, but zip code cell is far bigger than it needs to be. So let’s steal some space from the Zip cell and give it to the email field.
Now you could Reset in Airfig to revert to the template instance and adjust the size of the cells before regenerating the layout.
Make adjustments on the component
However, it actually makes sense leave the table as is, and make adjustments to the component, not directly to the table rows. All the table rows will change as you adjust the component, as they are all instances of it. The advantage is you can make your adjustments to all the rows at the same time, with the actual table data displayed.
Tip: Before you rush to adjust the component, Option-drag another instance of it, detach it from the component (right-click on it and select Detach Instance) so it is just a frame once more, and park it somewhere safe. This is your backup if you mess up the component while making adjustments. If needed, you can use this back up to quickly make a new component and generate a new table withAirfig, without having to start again from scratch.
So in these next steps, you are adjusting the component, while watching the effect it has on the table rows of the layout.
Size the layout to the required width
First, we’ll change the resizing settings to make the cells expand inside the container as we adjust it. Select the component’s row container and set its Resizing to Hug / Hug. Without deselecting it, press Enter, which will select all the cells inside it. Set their resizing to Fill / Fill.
Now press Shift-Enter to re-select the parent row container frame, and and drag on the its right vertical edge to widen the table. The cells will expand to fill the container frame. Once you have the layout to the desired width, reset the container frame’s Resizing back to Fixed / Fixed.
Adjust the cells to best display the content
Now you can adjust the cells. Select the Zip cell frame and drag its left edge to the right to make it smaller (note that Figma resets a frame’s Resizing to Fixed when you manually adjust it like this). The other frames are set to Fill so they will expand to fill the space. Select the email field, and make it larger until the longest email address fits. (You may have to make a few adjustments like this to get the table to where you want it.)
The table is now complete and looks like this.
Add the header row
Add a header row to the table by making a copy of the row template – (option-drag to make the copy) – it already has the row names. The select this new “header” copy, press Return twice to select all the text elements, and bold them.

Then drag this header row into the table as the first row – because the table frame has auto layout, you will see a blue indicator line along the top edge of the table when you have the row in position, and just drop it in as the top row. That completes your table.
If you got to here, congrats. I’ll soon link this article to a video version of this demo I am creating on the Redbar YouTube channel and you will see just how quickly all these steps can be done.
Happy Airfigging!