How Airfig Creates Layouts
It’s useful to understand how Airfig makes use of Figma’s Auto Layout capabilities to create fixed and fluid layouts.
Airfig and Auto-Layout
Airfig is a tool that’s designed to take advantage of Figma’s auto layout capabilities. The better that you understand auto layout, the more benefit you will derive from Airfig. Let’s see how Airfig uses Auto Layout to create complex layouts from your Airfig settings. To create an Airfig layout you first:
- Open Airfig
- Select the template instance in Figma
- Select the Airtable view with the data
- Map the Airtable fields to the target Figma layers
- Define the desired layout: rows, columns and spacing
Then you press the Run button and Airfig generates the specified layout using your settings.
Here’s what happens you press Run:
- Airfig creates a frame called af-layout that will enclose the Airfig layout.
- Inside this layout frame, Airfig surrounds each row of items with a frame layer called af-row.
- When the specified number of items have been laid out, Airfig adds the content to each one using the data from the defined sequence of Airtable records, so that each item has unique content.
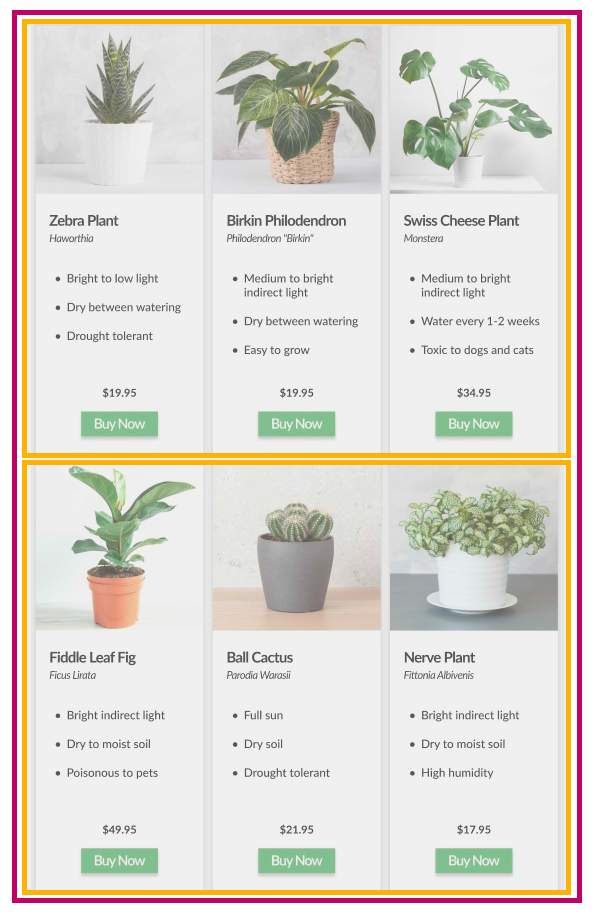
The above screenshot illustrates the AF frames added when a layout is created.
Red — af-layout frame that surrounds the layout
Orange — af-row frame that surrounds each row
Borders are colorized here for clarity. Borders are normally unstyled and invisible on screen.
Note that these AirFig-added layout frames (AF frames) are not visible in the layout as they have no border, stroke or fill applied to them, but you can see them in the Layers panel.
Airfig and Auto Layout Tips
Don’t style the AF frames
Generally, it’s best not to adjust the layout’s AF frames, af-layout and at least one af-row — if you need a border with padding around a layout, don’t style the af-layout‘s frame. Instead, wrap it with another frame and apply your settings to that new frame.
To wrap af-layout with a new frame, select the af-layout frame and press Option-Command-G. Select this new frame and apply Autolayout to it. Then set the desired border style and the padding between it and the layout.
Don’t resize the AF frames
Because the AF frames have a number of auto layout settings applied to them, do not drag-resize them, as this may cause the auto layout settings to change. Instead, make adjustments to the layout by using Airfig’s Reset capability to revert the layout to the original single instance, adjust the settings in Airfig, and Run the layout again.
Using Reset to adjust a layout
For example, if the spacing between the items is wrong, do not manually adjust the space between them by dragging.
Instead, select the af-layout frame that surrounds the layout and press Reset in Airfig. This will revert the layout to the original template. With the template selected, update your spacing settings in Airfig, and press Run to generate the layout again. You can Reset, adjust Airfig’s settings and Run again as many times as needed until you get exactly the layout you want.
Why dragging to change the size of an Airfig layout can cause problems
Changing the size of layout by dragging on an af-layout or af-row frame can break the Airfig layout, because this can trigger Figma to make changes to the layer’s Auto Layout settings without you realizing.
For example, if an AF frame’s Resize Setting is set to either Hug Contents or Fill Container, and you resize that element by dragging its edge, Figma will instantly change the setting to Fixed Width. This may impact the way an Airfig-created layout functions. Note that this is true of any layout that uses Auto Layout, not just those created with Airfig.
An Important Note on Airfig fluid layouts
An Airfig Fluid Layout fills in both directions the container in which it is created.
Airfig’s Fluid Layout setting causes the layout to be as wide and high as its surrounding container allows, so you must create a Fluid Layout inside a fixed width and height Figma frame.
The Airfig Fluid Layout uses Figma’s Fill Container resizing setting to cause the layout to expand horizontally and vertically to fill the space available to it, such as the content area of a page.
Figma does not allow you to create an element with a Fill resizing setting unless it is within a constraining Fixed size frame. If it is not within a containing frame, Figma will immediately change the Fill setting to Fixed. This is because Figma has an infinitely large canvas and so, for obvious reasons, does not allow you to have a layer try to fill it.
If you create a Fluid Layout outside of a containing layer on the infinitely large canvas, and drag it into the page afterwards, you will see that the AF frames’ Fill resize settings are Fixed—Figma has changed then from Fill— and you will not get the desired Fluid behavior.
Airfig’s key settings for fixed and fluid layouts
Fixed Layout
af-layout: H=Fixed, V=Hug
af-row: H=Hug, V=Hug
Spacing mode: Packed
Fluid Spacing
af-layout: H=Fill, V=Fill
af-row: H=Fill, V=Hug
Spacing mode: Space between